Tutorial - Page 9
Our sample report is shaping up nicely; how about we clean up the city, state and zipcode information so it prints nicer on the page?
We've opened up the report so the Report Formatter is onscreen:

Notice that the two address lines are being truncated; the city Fields is also being cut short. To combine the City/State/Zip code information we'll need to eliminate the blank spaces after two of the fields (city and state), insert a comma between the City and State fields, and a blank space before the zip code is printed. This will change the output from: TUCSON AZ 85730
to: TUCSON, AZ 85730
We'll also have to play with the column headers abit, since there will no longer be 3 individual columns of information. However, armed with the tricks presented on Page 8 of this tutorial this will be very easy to achieve.
Here is one way to achieve the desired results:
Resize the DETAIL band to give yourself some room to maneuver in
Select the City/State/Zip Code FRAMES together and drag them downward to give yourself room to manuever in
Create a new FRAME where the City/State/Zip Code FRAMES used to be
Click the Dictionary button to display all the functions for the Report Builder
Select CLIP() from the functions relating to Strings
This will insert '=CLIP(string)' inside the Contents entry field; delete the word 'string' from inside the '()' characters or make the word 'string' highlighted, , then click on the Dictionary button again
Select the field for City from the Dictionary; the Contents entry field now shows =CLIP(NAM:City)
Now we need to add a comma character after the CLIPped City field; change the Contents entry field to show =CLIP(NAM:City) & ', ' &
Click the Dictionary button again and select the CLIP() function again, then remove the word 'string' from inside the '()' characters.
Click on the Dictionary button and select the State field.
Now the Contents entry field shows =CLIP( NAM:city ) & ', ' & CLIP(NAM:state) &
We need to add a blank space after the State field is printed; after the last Ampersand (&) character add a single space surrounded by quote characters: ' '
Click on the Dictionary button and select the ZipCode field. This completes cleaning up the City/State/Zipcode information, and our FRAME Contents look like this:

Now we need to change the Picture to accomodate the combined length of the three fields, plus the comma and space characters between the fields. If you don't know the length of the fields you can click on the Dictionary button to retrieve their lengths. For this example we have 30+2+2+1_10 = 45; chances are high that the length will be MUCH shorter than this, so it is up to you if you want to shorten this up abit to save space on the output.
Go ahead and click the Picture tab on the FRAME properties box. Right now the picture entry field is completely blank:

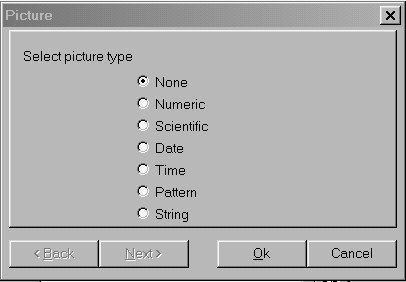
Click on the "face" icon to display the Picture formatter. Information on Pictures are explained in detail elsewhere in this help file, so we'll rush through this section, and you can read up on Pictures at your convenience. A popup window of picture types is shown onscreen:

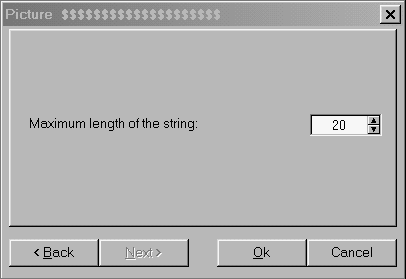
The FRAME that we created for the 3 combined fields contains a String, so choose the String readiobutton and click NEXT. You are prompted for the maximum length of this string:

The default value is 20 positions; we'll change this to 45, then click OK. Now our Picture entry field in the Frame properties box looks like this:

You will also notice that the FRAME contents in the DETAIL band have changed to dollar ($) signs. Go ahead and resize the new FRAME to the correct length, then align it to be lined up horizontally with the other FRAMES in the DETAIL band.
Now we can delete the headers for Zip Code and State (right click the FRAME, then select DELETE from the popup menu to remove that header FRAME). Now we have one header FRAME left for City; we can modify that Header to reflect a more fitting description. We'll need to resize that header FRAME after changing the text, then left align it with the associated FRAME in the DETAIL band so everything lines up.
Go ahead and delete the original City/State/Zip Code FRAMES that we moved downward inside the DETAIL band, since they are no longer needed. We'll also move the new FRAMES for the combined City/State/Zip Code database fields as far to the right as possible - we need to free up space for the Address lines that are being chopped off.
While we're at it, we can add back in the Country field that we originally didn't have room for. We'll make the DETAIL band print 2 lines for each database entry. Here is what the final DETAIL band looks like:

Go ahead and save the changes, then print a sample report to see how everything looks:

Quite a difference!
